This chapter contains the following topics:
Printing a Void Checks Edit List
Posting Voided Checks and Direct Deposit ACH Payments
The Void checks selection enables you to automatically void a check or direct deposit ACH payment after it has been printed and posted using Print checks and post. It also allows you to void a manual check which was entered and posted using Open items (Modify).
You might have to void a posted check issued to a vendor whose invoices are in dispute, one accidentally sent to the wrong vendor, one issued prematurely, and so on.
The end result of Void checks is essentially to create a reversed check or direct deposit payment. The original check or direct deposit payment is retained in history and a reversed void entry is generated when posting a void check.
|
Note |
A direct deposit payment transaction may not be voidable after submitting the ACH file to your bank. Before entering and posting a void, contact your bank to verify that the payment has not been deposited to your vendor's bank account. If you have not submitted the file to your bank it is better to rename the original ACH file as voided, void the entire check (direct deposit) run using Void checks, and rerun Print checks and post creating a new ACH file. This will help make your ACH file data accurate. |
In order to use Void checks, you must have chosen in Control information to retain vendor history. Keeping vendor history is highly recommended. Without history, not enough information is available about a check to completely undo the accounting changes caused by the check. If you are not keeping vendor history, refer to the Voiding Computer Paid Checks (when vendor history is not used) section in the Prepare Payments / Checks and Direct Deposit ACH chapter.
|
Note |
Do not use Void checks to void Non-A/P checks. Such checks are voided by entering a negative Non-A/P check in Payables for the same amount as the original check. |
A void entry does not take effect immediately; it must be first entered and then posted. This allows transactions to be reviewed before they are applied.
A posted void check in vendor history results in at least three records; the original voucher(s), the check or direct deposit payment and the new voided check record.
|
Note |
Prior to PBS v12.04, all voided checks were written to history with no vendor number and no voucher number. The original check was removed. After upgrading from 12.03 or earlier to any more recent version, your older history will still reflect this. Checks that are voided during a check run are still written to history with no vendor number and no voucher number. The reference is written as Voided at check run. For a void posted in v12.04 or later using the Void checks menu selections, a voided record is written to history with the amount reversed and the original check is also retained. The original vendor and voucher number is being written to the void record. |
For Void checks to work all the following must be true:
| • | The vendor who was to receive the check is still in Vendors. |
| • | The vouchers paid by the check have not been purged using Fully paid open items. |
| • | The vouchers paid by the check have not been purged out of vendor history. |
| • | None of the vouchers paid by the check is currently marked for manual payment, using Open items (Modify). |
| • | None of the vouchers paid by the check is currently selected for payment by a computer check or direct deposit payment, using Select group of vouchers or Select individual vouchers. |
Because of the last two conditions, do not attempt to void checks when you have already selected vouchers for payment (using Prepare payments) or have marked vouchers as manually paid (using Modify).
In order to undo the payment, Void checks must use and update many files/tables within A/P. Thus there are restrictions on when this function may be selected.
In a multi-user environment, only one user may enter Void check transactions at a time.
In addition, the following selections cannot be run at the same time as Void checks:
| • | Modify open items (Enter or Post) |
| • | Check selection (individual or group) |
| • | Print checks and post |
| • | Purge vendor history |
| • | Purge open items. |
Void checks performs the following actions:
| • | The original check or direct deposit ACH payment is retained. A void check record is recorded in vendor history with a reversing amount. |
| • | For each voucher paid by check or direct deposit, the amount paid on the voucher is added back into the balance remaining on the voucher. |
| • | If there is no balance remaining on the voucher at the time the void check transaction is posted (i.e., the voucher has been fully paid), the voucher is reinstated in A/P Open Items. |
| • | This reinstated voucher has a balance remaining corresponding to the amount paid by the voided check (plus any discount taken). |
| • | Discounts taken for the vendor paid by the check or direct deposit ACH are reduced. |
| • | Form 1099-MISC amounts (if applicable) for the vendor paid by check or direct deposit ACH payment are reduced. |
| • | Debits and credits created by the original check or direct deposit ACH payment are reversed and appear in the A/P Distributions to G/L Report. See Distributions to G/L. |
| • | The distribution date for the reversed entries can either be the original check or payment date or a specific distribution date entered in the void checks transaction. This allows for proper accounting if a check or direct deposit ACH payment is voided in an accounting period later than the one in which it was originally printed. Do not enter a date that is in a closed G/L fiscal year or in a future year not yet open in G/L. |
The process of voiding checks and voiding direct deposit ACH payments has the following steps:
| • | Ensure that no vouchers are selected for payment. This can be checked by running the Pre-check writing report and then using Clear selection / deferrals to clear any vouchers currently selected for payment. |
| • | Ensure that no vouchers are marked for manual payment. This can be checked by printing the Modify Open Items Edit List. |
| • | Enter the void check or void direct deposit ACH payment, using Enter. |
| • | Print the edit list, using Edit list. |
| • | Verify that there are no error messages on the edit list that indicate that the check cannot be voided (these messages correspond to the constraints on check voiding described above). |
| • | Verify that the vouchers paid by the check or direct deposit ACH (as shown on the edit list) are the same vouchers that were paid by the check or direct deposit ACH originally. Consult your original A/P Check Register or Modify Open Items Register. |
| • | Post the void check and void direct deposit ACH payments. |
Select
Enter from the Void checks menu.
If you are using Batch controls, a screen appears at this point for you to select the appropriate batch. Refer to the Using Batch Controls in the System Userdocumentation.
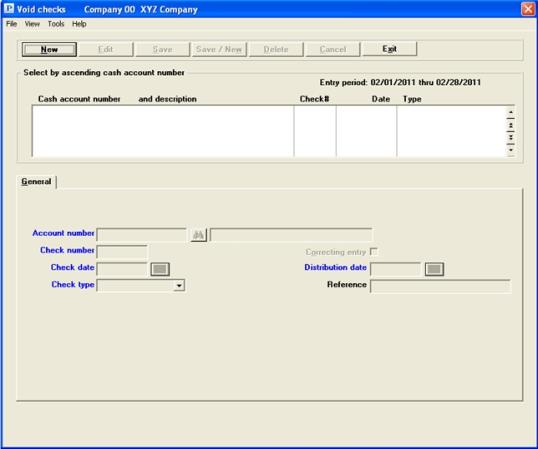
The following screen appears:
Graphical Mode
There are no entries in the window above. If there are any existing entries, they will display in the list box at the top of the screen. The first entry will display in the fields below.
The list box displays up to 6 void check entries at a time. You may sort the entries by cash account number in ascending or descending order. Only column names in red may be sorted. Click on the column name or the arrow to the right of the column name to change the sort or use the View menu options.
To locate a entry start typing a account number. You may also use the up/down arrows, Page up, Page down, Home and End keys to locate an item. The <F1> and <SF1> keys are the same as the up/down arrow keys.
Entries that display in the list box are available for changes or deletion. The fields for the selected entry display in the lower part of the screen.
When an entry is found, you may select the <Enter> key or Edit button to start editing.
See below for a description of each void check button or keyboard equivalent:
|
New |
Alt+n |
To enter a new void check |
|
Delete |
Alt+d |
To delete the void check selected in the list box. You may also select <F3> |
|
Edit |
Alt+e |
To edit the void check selected in the list box |
|
Save |
Alt+s |
To save a new void check or changes to an edited void check |
|
Save/New |
Alt+w |
Same as Save button plus the New button |
|
Cancel |
Alt+c |
To cancel adding or editing an void check |
|
Exit |
Alt+x |
To exit the screen. You may also use the <Esc> key |
Menu Selections
At the top left of the screen menu selections are available. Most of these are the similar from screen to screen. If a menu selection is grayed out you will not be able to access it. The selections that are unique to this screens are explained here:
The Print menu selections include printing an Edit list. See Printing a Void Checks Edit List. The selections also include printing a Check register, Purchases/Discounts and Vendor history.
The Options menu selections include View vendor invoices and Void check Post. See Posting Voided Checks and Direct Deposit ACH Payments.
Character Mode
The following screen displays:
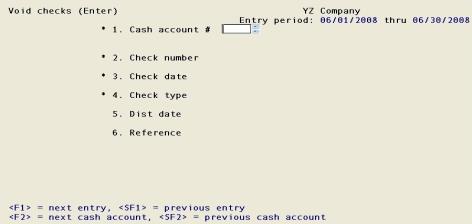
From this screen you can work with both new and existing void check entries. You must identify the check by both number and date before you can void it.
Enter the following information:
Options
Enter the cash account number. This must be an existing entry in the Cash accounts selection of the System Control (CTL).
|
Format |
Your standard account number format, as defined in Company information |
|
Example |
Enter account 1000-000 |
Enter the number of the check to be voided. If you are voiding a direct deposit ACH payment, enter the ACH transaction number.
|
Format |
999999 There is no default. |
|
Example |
Type 105 |
Enter the date the check was written.
Options
You have the following option:
|
<F4> |
To select a field from the date lookup |
|
Format |
MMDDYY There is no default. |
|
Example |
Type 40105 |
Enter either Computer check, Manual check or ACH payment.
|
Format |
One option from a drop down list |
|
Example |
Select Computer check |
If you select an ACH type, you will be warned that the ACH file may have already been sent to the bank.
|
Note |
If this check or ACH payment transaction cannot be found, you are so informed. The program checks the account number, check number, check date and type. If any of those do not match the original it will not find it. |
|
Note |
If the check is already voided you are prevented from finishing the entry. |
This option is only available if you are interfaced to the General Ledger module and you have checked the box to the field Allow correcting entries in G/L Control information.
Select the Space bar to insert a check mark and make it a correcting entry or select the Enter key to skip this field.
Options
You have the following option:
|
<F5> |
To toggle the check mark on or off. This may be done on any field. |
|
Format |
Check box, checked is yes and unchecked is no |
|
Example |
Press <Enter> |
The distribution date displayed is the original check date.
If you are voiding the check in the same accounting period as it was posted, press <Enter> to use this date.
If you are voiding the check in a later accounting period, enter a distribution date within the current accounting period.
It is recommended that do not you use the original check date as the distribution date if that date occurs in a closed General Ledger fiscal year.
The date entered here becomes the check date in vendor history and becomes the transaction date in Check Reconciliation.
Options
You have the following option:
|
<F4> |
To select a field from the date lookup |
|
Format |
MMDDYY The default is the original check date. |
|
Example |
Press <Enter> |
You may be warned or stopped against entering a date that is outside the allowed date range. For more information, read the Date control section of the Control information chapter.
Enter whatever reference you wish.
|
Format |
25 characters |
|
Example |
Type Shipment returned |
Options
Make any needed changes. Select <Enter>or you may also use one of the button options:
|
Save |
Save the existing entry |
|
Save/New |
Save the existing entry and starting adding a new one |
|
Cancel |
To cancel the current entry |
|
Exit |
To cancel the current entry and return to the menu |
|
<F5> |
To toggle between a correcting entry and a non-correcting one. This option is only available if you are interfaced to the General Ledger module and you have check the box to the field Allow correcting entries in G/L Control information. |
This selection lets you review your void entries before posting. You can compare the edit list to the original Check Register or Modify Open Items Register to ensure that the vouchers listed are the ones that were paid by the check or ACH payment.
Select
Edit list from the Void checks menu or Void checks edit list from the Reports menu.
See a A/P Voided Checks Edit List example n the Sample Reports appendix.
Only a printer selection screen appears because all void check entries are printed unconditionally. The A/P Voided Checks Edit List is not separately illustrated but is identical except for the title to the A/P Voided Checks Register in the Reports appendix.
This selection posts the voided checks and direct deposit ACH payment entries and prints a register. After running this selection there will no longer be any entries in Void checks (Enter).
Select
Post from the Void checks menu.
A printer selection screen appears for printing the void checks register.
There will be a period of processing as each of the actions described in the Void Checks Functions section is performed for each check and direct deposit ACH payment voided. A running display of the current check or ACH payment being processed appears on the screen. If you are using Check Reconciliation, the distribution date becomes the date in the checkbook and it also becomes the check date in vendor history.
You may now reselect the vouchers that were reinstated in A/P Open Items for payment by computer check, ACH payment or manual payment.
See a A/P Voided Checks Register example in the Sample Reports appendix.
Interface to Check Reconciliation
What happens during posting depends on your settings in Check Reconciliation Control information. Per the setting you may (or may not) be posting automatically to the C/R Checkbook (CKBOOK).
When using the automatic interface:
| • | The original posted check was posted and written to the checkbook as a debit. The voided check is posted as a credit amount. |
| • | For each voided check the Void Check Register indicates: |
*** Voided check transferred to Check Reconciliation ***
When transferring using the Transfer checks/deposits interface the check will still be voided in A/P history; however, depending on the situation one of two things may occur:
| • | If the check is already transferred to C/R, the void will be transferred as a reversed (credit) entry. |
| • | If the check has NOT been transferred to C/R, the posting program will create the void in A/P history and transfer both the check and void the next time Transfer checks/deposits is run. |
If the check was never transferred to the Check Reconciliation checkbook, however it is marked as transferred in A/P, a warning will display. Under normal operation this should not occur. However, if this does occur, in order to keep the checkbook in balance you must enter an adjustment in the Load checkbook (Enter) selection found under the Utility menu.
Here is an example of the original check and voided reversed entry in the C/R Account Activity Report:

When a check is voided this is what happens in history:
| • | The payment remains in history |
| • | The original voucher(s) remains in history and are now available to be paid in open items |
| • | The void check is written to history |
Here is an section of the vendor history report that shows a voucher invoice, positive pay check and voided check:
